the site
NewsAbout Stefan
3D section
PoserPixels:3D
Cinema4D
Misc
Music ProjectsSoftware
iBook
Material Room - beyond the first step
Where's the first step you ask? Well, I don't see the point of rephrasing the Poser manual, therefore this tutorial assumes you have already taken step one, which would be reading chapter 43 (Materials) and the "root nodes'" part of chapter 44 of the Poser manual. If you haven't figured out yet how to change the basic color or the highlight color of a surface (hint: click a color field), I'd recommend you do that to before you continue reading this tutorial.
Got that? OK, so then I'll point you to the second step. Since there is already a good tutorial on how to do basic texturing on a Poser 4 level in the Poser 5 material room, I don't see the need to rewrite that either. Click this link to read a thread over at PoserPros (free registration required and worth every Penny) that will give you an introduction to that. Since you have already read chapter 43 of the Poser 5 manual, following that thread should be easy.
important note: I am using a German operating system, which is why there is a comma instead of a point as a decimal separator in my screenshots. If you are on an English operating system, you will need to use a point instead.
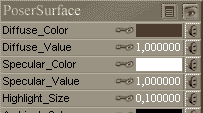
Finally, let's get started. Your first excercise will be building a leather material. Therefore, you load an empty scene with a few light sources (the Poser 5 default lighting will be sufficient for now) and load the ball prop. Go to the material room and select the ball's material. Start by setting the diffuse_color: A dark brown should be fine for a start. Then, take a look at the glossyness: Leather is glossy, but does not have too sharp hightlights. For my eyes, a Specular_Color of white, Specular_Value of 1.0 and a Highlight_Size of 0.1 are a good start for a leather material.
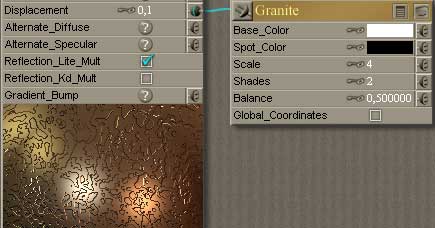
As of now, the material looks more like a cheap plastic imitaition of leather, but to become real leather, it still lacks some detail. Therefore, add a new node to the material: 3d_textures/granite. Since we want to add some irregularities to our surface, plug it into the displacement channel. (At this point, make sure you have enabled displacement mapping in the render settings. If you don't know how to do that, click here.) If you render now, you'll see that this is way too much: Instead of fine ripples in the surface, you got spikes from it. Head over to the value of the displacement channel and set it to 0.1. Hit render. Ahhh....much better. Still, some more adjustments can't hurt: The structure is rather too fine, so change the scale parameter of the granite node to 4. Next, reducing the number of steps from 4 to 2 will also get a little bit closer to what we want.
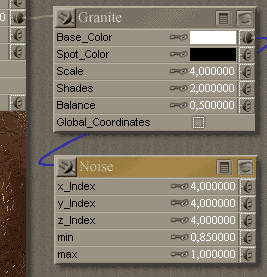
But it looks a little too polished again, doesn't it? Add another node: 3d textures/noise. Plug it into the granite node's base_color. Render? Uh, that was too much again. Tune it down, change the min parameter of the noise node to 0.85. Muuuuch better. If you enable the previews of the noise and the granite node, you'll see why I wanted you to add the noise node: Instead of the plain white in the granite pattern you had before, you now have an irregular white/bright grey.
Now hit render again. Does that material look OK for you? If yes, congratulations, you just built your first procedural shader!