the site
NewsAbout Stefan
3D section
PoserPixels:3D
Cinema4D
Misc
Music ProjectsSoftware
iBook
The Poser 5 renderer introduced not only spiffy new features and a marketable name (FireFly) but also many new options that may confuse one or the other user. Here's a quick illustrated overview over Poser5's rendering settings dialog, top to bottom:
![]()
These buttons switch between two presets "Draft" and "Production". By default, Draft is faster at lower quality, Production takes longer but delivers better images. You can change these presets as you like.
![]()
These buttons switch beween the two renderers that Poser 5 comes with: The new FireFly engine and the old Poser 4 renderer. My personal recommendation is the FireFly renderer, as many features are not available in the Poser 4 renderer.
![]()
This setting affects displacement maps only. If you are not using any displacement materials, turn it off for faster rendering. If you are using displacement materials, experiment with the value in the displacement bounds. Lower numbers mean faster rendering but may cause holes in objects with strong displacements. Note that you can set per-object displacement bounds in the parm dial palette.
![]()
You need to turn this on if you want to use raytraced shadows for your lights or raytraced reflection or refraction in your materials. If your materials and shadows don't use raytracing, which is usually the case, turn this off to speed up rendering.
![]()
Should be obvious. Turn this off and your scene will have no shadows but render significantly faster. In general, you want this to be off in your Draft setting and on in your Production setting.
![]()
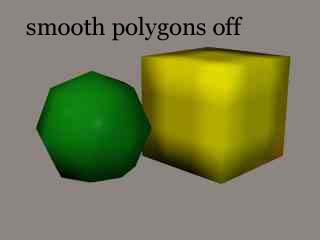
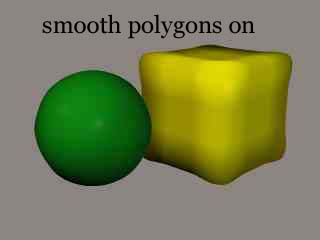
With this turned on, hard edges in the geometry get smoothed out. In some cases, it can "blow up" some objects, if that happens turn off polygon smoothing for that object in the parameter palette. Again, turning this off may decrease image quality but speed up rendering.
![]()
Turning this option on can speed up rendering, but also make parts of some objects invisible. Wether that happens or not depends on the geometry of that object, so you have to test that scene by scene. My recommendation is to turn it on by default and to turn it off when you see missing parts in your renderings.
![]()
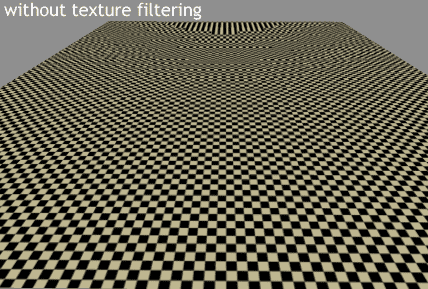
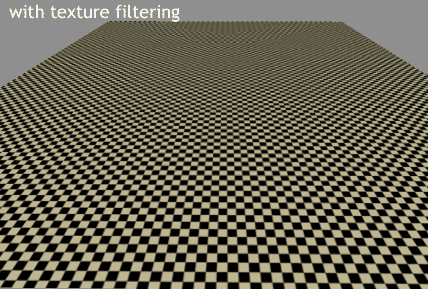
This option will reduce "noise" that you can sometimes see when you have high-contrast pattern textures that are far away from the camera - e.g. a tile pattern on the floor.
![]()
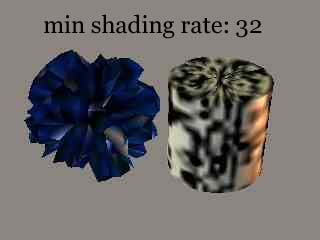
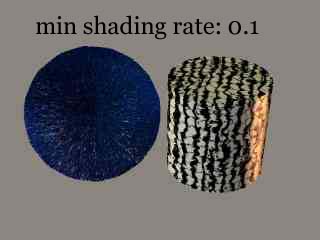
This value defines the size of a "micropolygon", which defines how fine or coarse the resulting render is. By tweaking this parameter, you can trade detail for speed or vice versa. Low values result in sharp renders and slower rendering times, higher values render faster but can lack detal. For production renders, somewhere between 0.5 and 1.0 is a good start. In cases you might have go as low as 0.1. For drafts, don't hesitate to go up to the range of 10-20 for fast renders. When using fine displacement mappings for fur or similar effects, you should use small numbers like 0.2.
Note that this parameter is available for each object separately in its properties palette, so you can chose to render a background prop at low detail with a shading rate of 4 and a character in the front with lots of detail at a shading rate of 0.2.
![]()
This one's easier again. Low numbers will save memory may lose texture details.
![]()
This is a very important parameter, it determines how many samples are taken for one pixel. Using a 1 will give you high render speeds with no antialiasing, so use that as a draft setting. 3 is actually a good production value but if you are using features like 3D motion blur or depth of field you probably need to go up to 12 in order to obtain smooth images.
![]()
As you can see during rendering, FireFly is rendering in "patches". This defines the patch size. Low numbers mean slow rendering speed and less memory requirements, high numers mean high rendering speed and high memory requirements. Depeding on the size of your scene and the RAM in you computer, crank this one up for much faster renders. Note that this paramter does not affect the quality of the resulting image.
![]()
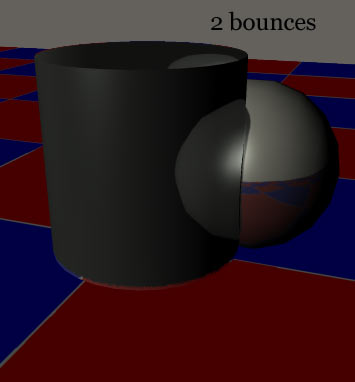
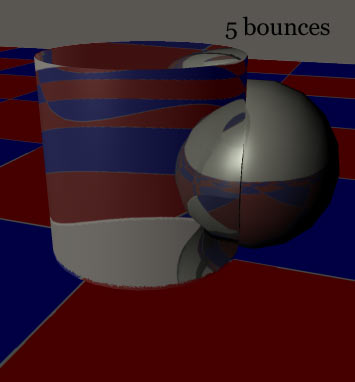
This one's only important when you use raytracing nodes in materials (reflect and refract). It defines how often a ray can hit an object. E.g. with a value of 0 you have no raytracing at all, 2 will allow reflections, 3 is the minimun to see through an object (the ray has to go through a front- and backside polygon, then hit a polygon behind the transparent object) and with 4 bounces you can see a reflection in an object behind a transparent object. If you use raytracing only for shadows, a value of 0 is enough.
Examples:
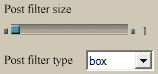
This setting affects antialiasing. It determines how FireFly is creating the resulting pixel from the micropolygons. Higher numbers create smoother images. The three filter types have different visual characteristics. The box filter can get blurry at sizes 2 or above, but is the fastest of the three. The gausssian filter is much better in that respect, while still eliminating jagged edges. A guassian filter at size 2 can give your image a slightly smoother feel to it. The sinc filter should only be used with a high number of pixel samples and can provide probably the sharpest picture while still providing antialiasing, which looks good on strand-based hair. In some cases it can happen that the sinc filter overemphasizes some edges.
Liked this tutorial? Hated it? Wanna see example renders? Email me and let me know!